In a recent post I promised details about making a scarf designed by Madeleine Vionnet, which is shown at the bottom of this post in the photo composite. As I mentioned, the Betty Kirke “Vionnet” book, which you can see on this link: http://www.amazon.com/Madeleine-Vionnet-Betty-Kirke/dp/1452110697/ref=sr_1_1?ie=UTF8&qid=1387372857&sr=8-1&keywords=vionnet+kirke has drawings of pattern pieces for a number of Vionnet gowns, and also for this scarf. The one thing that’s missing is the “key” to the dimensions of the pieces, which makes the gowns difficult to recreate.
In recent years, the Bunka fashion school in Japan took Betty Kirke’s drawing and recreated them, putting the pattern pieces on a grid. There was an exhibit of the recreated gowns, and then the book with the patterns and instructions (pictured above) was released. Currently this book is only available in Japanese, but between the two books it’s possible for an English-speaker to figure out how to recreate the patterns, which is pretty amazing. Here’s a link to the Bunka Vionnet book: http://www.amazon.com/Vionnet-Japanese-Bunka-Fashion-College/dp/4579109430/ref=sr_1_1?ie=UTF8&qid=1387373215&sr=8-1&keywords=vionnet+bunka
I decided to test out a method of recreating these designs by using a relatively simple pattern, which was the scarf. Since these books are under copyright, I won’t be showing the actually pages with the pattern and direction, but you’ll get the idea.
Since I was too lazy to draw the gridded pattern onto a larger sheet of paper, I found a website called rapidresizer.com, copied and uploaded the picture of the pattern in the book, then was able to set it to print out on a larger scale. It came out piece by piece on 8″x10″ paper, and then I taped it together like a PDF pattern. After some trial and error, it worked fine.
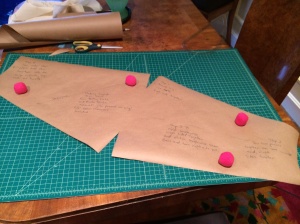
I traced over the pattern with butcher block paper, and it looked like this:
 If you look closely, you’ll see that the grainline is on the bias, which a very important element in the drape of the scarf. Vionnet’s manipulation of the stretch on the bias in her garments are what made them architectural masterpieces. According to Betty Kirke, Vionnet did a line of dresses that she shipped to US manufactures that were unhemmed. The idea was that the bias cuts would stretch to fit anyone, and all the store had to do was lengthen or shorten for the individual customer. Unfortunately the idea was way ahead of it’s time and it bombed. But wow, what a forward-thinking concept!
The instructions for the scarf are all in Japanese, but I’ll give you the general jist:
Cut two of the pattern piece shown above, on the bias. Choose a fabric with some crispness, or underline a soft fabric with identical pieces of silk organza. You’ll need about 1 1/2 to 2 yards of fabric, and I suggest using something that looks interesting on the bias. Here, I used some vintage 30s wool challis from International Silk and Woolens in Los Angeles.
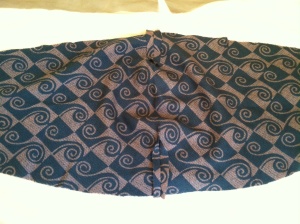
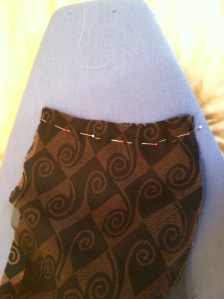
 Sew the “V” shaped cutouts into darts on both sides of both pieces, right sides together, and press. When sewing on the bias, be very careful not to stretch the fabric as you feed it into the machine.
 Sew two of the short ends of the pieces right sides together (you can see I’ve added a silk organza underlining to this soft wool challis).
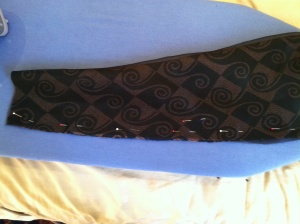
 Fold the entire scarf lengthwise, right sides together, and sew along the lengthwise seam, again being careful not to stretch it as you’re sewing. Press the seam open.
 Turn the entire length of the scarf right side out via one of the short ends. The lengthwise seam is now the center back of the scarf. Give that seam and the rest of the scarf a soft steam press, avoiding making creases.
 Tuck under the seam allowances of the two raw ends at either end of the scarf. Make the scarf into a circle like an infinity scarf, without any twists. Insert one unfinished end into the other and fell-stitch them together. You’re done!
 To wear the scarf, fold it in half and put the two narrow ends behind your neck. The two large loops will be hanging down in front of your chest. Stick your hands through the loops as shown, grab the outer edges and pull them through. The scarf becomes a bow like magic! Fiddle with it a little to hide the seam. Sometimes I find it works better to put it on inside-out so the seam is hidden when you pull the loops through.
This scarf is so distinctive, yet easy to wear. The bias cut and darts give it that bow “poof” without a big knot. What a great design!
This is why I’m doing this type of re-creation, honestly. It’s one thing to see these designs in photos, but it’s much more educational and meaningful to go through the designer’s process and then hold it in your hand. My hat’s off to Betty Kirke and the people at Bunka who painstakingly researched these patterns. It’s a rare window into early 20th century design.
I’d be curious to know whether any of you are fans of Vionnet. Have you seen any of her creations up close? She closed her atelier during WWII so I can’t imagine there are many of her gowns still circulating in the vintage world, though there are a number of them in museums, thank goodness. I’ve been getting so many interesting comments, and would love to hear more. Thanks for stopping by.

It is so simple – and so effective! As yourself – I think we too much look at Chanel and forgetting a great number of designer from her time. I was checking the website of the Metropoiltan Museum of Art and they have a stunning collection of her desinges. I have seen one dress I am tempted to try. I will try the scarf as well 🙂
I hope you will give them a try. Some of the dresses in the book are amazing. Apparently because they’re cut on the bias they’re not so hard to fit.
I love looking at the Metropolitan Museum of Arts online collection from the Costume Institute (metmuseum.org). They have such a wealth of designers’ outfits. I enjoy looking at their Claire McCardell collection–she studied Vionnet’s designs as a student in Paris on the 20s, and her later designs frequently make use of the bias cut.
These designes are really stunning… worth to try! :- New year – new projects 🙂
I’m so excited to take a closer look at this scarf and try to make one! They are oh so cute, timeline, distinctive and fun! Thanks for posting this Julie!
They’re a lot of fun to make, Carrie, and they only take a couple of hours. As a fellow Bostonian I know how important a good scarf collection is to dress up our winter coats day after day. If you need help with the pattern or construction, please let me know.
That’s a really interesting design. So, is a Vionnet gown next on your sewing list?
Thanks Lizzie. I would love to give one of those gown patterns a try at some point. Some of the patterns in the book don’t look that difficult, and would be fun for summer. The bias cuts are good for getting rid of fabric stash, too, as they eat up a lot of fabric. But I need to use up some Savile Row light wool stripes and plaids from my stash, so there may be some McCardell day dresses coming up first. Too many ideas, not enough time!
You might want to take a look at this then : http://www.fashion-incubator.com/archive/grading-stretch-knit-patterns-pt-2/
That’s if you haven’t seen it!
Thanks, Carmen, I’ll check it out. It’s amazing how much there is to learn when you start getting deep into garment construction.
Pingback: Can’t Let Go…. – Sew Everything Blog
I made the Vionnet scarf following your tutorial. It was fun to watch my friend trying to make the knot. She did it and it look really good on her. Anyway… Thank you for posting this amazing scarf tutorial. One question I have is since this was made in the 1920’s is it now public domain? What about copyrights?
Thank you for any information you can share with me about copywrights about this scarf ?1920’s designs/patterns.
Hi Sam, glad you enjoyed making the scarf! As for any rights information, I’m no expert, so you would need to consult an intellectual property lawyer.
Julie, I knocked myself out trying to find the scale of those Vionnet patterns in the Kirke book. Then I tinkered with one of my Barbie patterns and made my own scale. I start out with my side seam usually to determine the desired length. just fraction it out based on the side seam length of the tiny pattern. use the radial method to enlarge the pattern. Viola!
That’s great info, thanks!